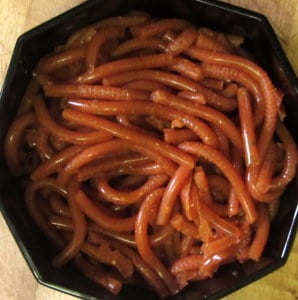
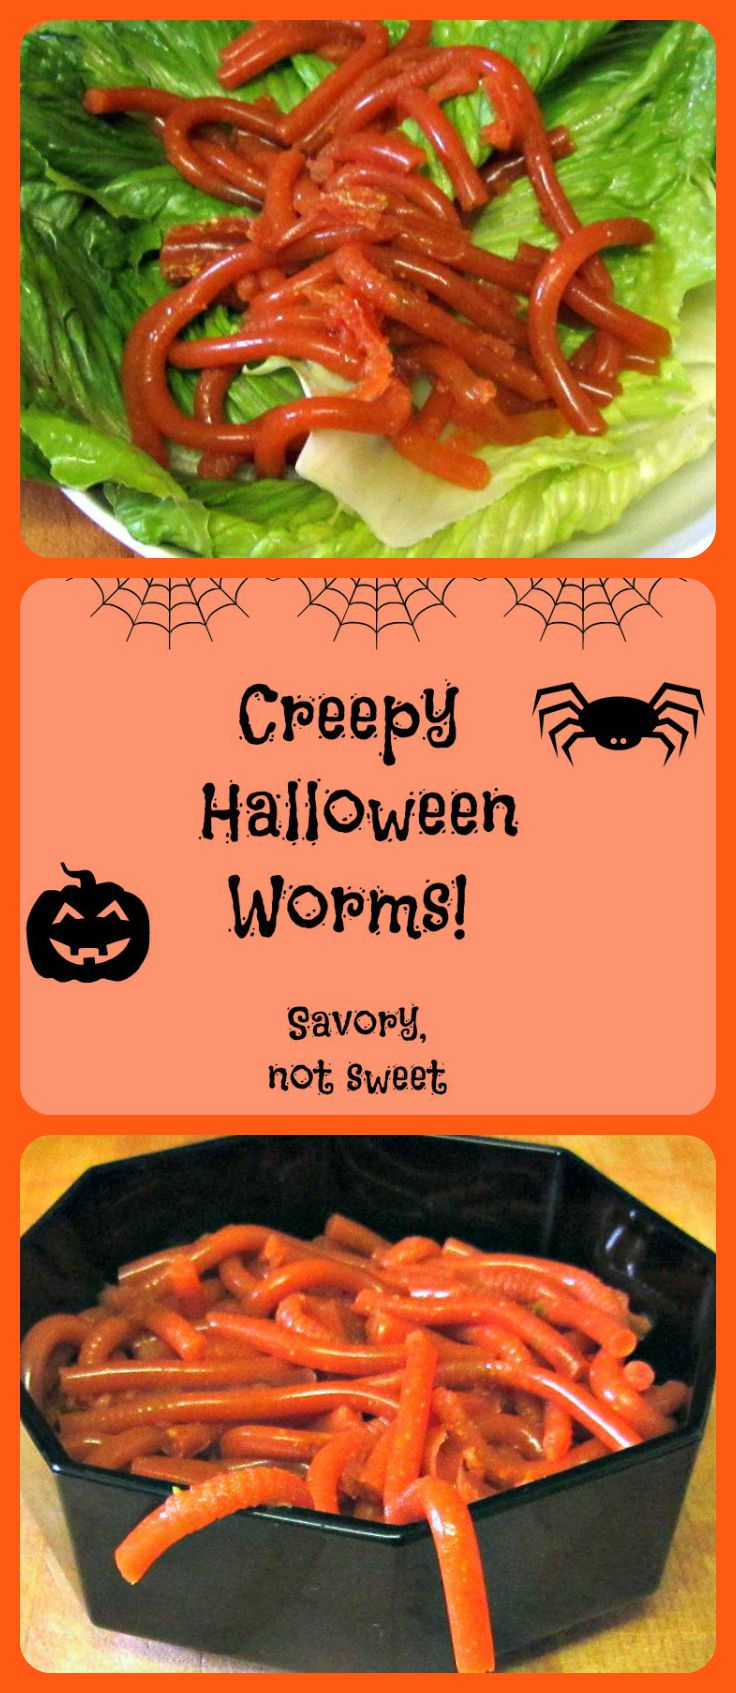
Savory Halloween Worms
 This was an experiment, and I made a couple of batches, and I definitely refined my technique along the way… so you can totally learn the easier way to do this! (Well, that’s what I’m here for, right?)
Let me back up. A few years ago, I saw a post… somewhere… about making your own gummy worms from jello, using straws. I never did like gummy candy, and I don’t eat sugar stuff now, but it seemed a sort of cool idea and stuck in the back of my head.
 Then one day I thought… worms… red… tomato aspic… They don’t have to be sweet! I should try that Some Day, maybe make a Halloween treat for a party!
Searching now for the original gummy worm idea, I find that concept posted all over the place – so I have no idea whose idea it originally was, I don’t know if the poster I saw (whoever that may have been) got it from someone else, I can’t give credit for the straw idea. But… aspic… even people using fruit juice instead of jello are still going for sweet. I have friends who like savory better… so I thought sure, let’s try this.
Well – I’ve made them a couple of times, now. The first thing I’ll tell you is that this is a make ahead dish. There are a couple of iterations of do something, then chill it, do something, let it dry a little… Don’t start this the morning of the party. (But then, isn’t it nice to have something that will be finished the day before?)
The second thing I’ll tell you is that all the other blogs I saw showed the finished product – and maybe a picture of straws in a glass. They didn’t show the messy bits in between. I inhabit this kitchen, and I’ll show you the messy bits – and if you have kids, get them involved, they’ll love it… especially if you encourage a fine discussion of how gross it all is. (Or do they say “gross” these days? Is there a preferred word? I’m so out of touch…) I’ll also show you the techniques we developed (Rich helped me) to make the fussy part easier.
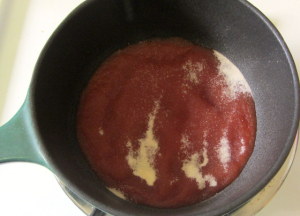 So – basically I made aspic, but with more gelatin. I used canned vegetable juice again, because I like it and have it – tomato juice would work perfectly well. I poured some of it (and I’d do about a cup, with this much gelatin) into a small saucepan, and sprinkled three packets of gelatin powder over it to soften. (Yes, that is three times as much as I normally use for two cups of juice.) I let it sit about five minutes until it was soft, then heated the pot gently and stirred it, until it all dissolved. (I did have to be more careful than usual to avoid lumps, with this much gelatin.)
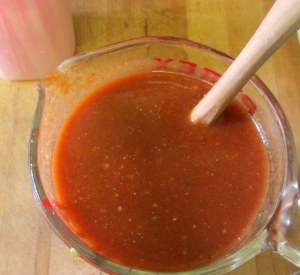 Then I seasoned the rest of the juice. I usually use some pepper sauce, and was thinking of increasing that to make them zippy – but then thought… The most visually successful of the gummy worms I’d seen had a little cream in them, to make them opaque. Now, the juice was already opaque, but… what did I want the worms to look like? Well – worms, of course – earthworms, to be more precise. When I was a kid, every time it rained the worms came up out of the lawns, and they fascinated me… so I’ve seen quite a few of them. I thought – I want it a little more solid looking, and I want to bring down the red color a little… In my first version, I used a little sour cream – but it ended up pink, which wasn’t what I wanted, and I think the fat in the cream softened the texture a little. This time, I used a tablespoon of yogurt, and a tablespoon of a commercial pesto. (I keep it on hand to liven things up.) The green dulled the color just a little, and the slight grittiness of the pesto added nicely to the “Ew, gross!” factor. (And if one *is* making worms… ) I stirred the heated juice with the gelatin into the seasoned juice.
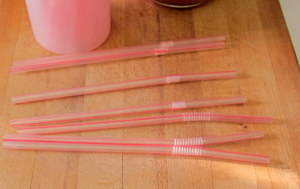 Straws. OK, the clever thing about using the straws is the discovery that the flexible part gives you the look of the segmented part of an earthworm, so they’re not just long tubes. So, while plain straws will work, the flexible ones give a more convincing result. You need to pull out the flexible bit so the straw is straight and fully extended.
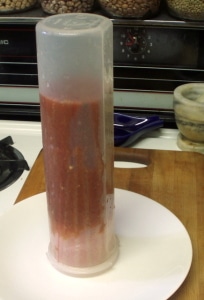
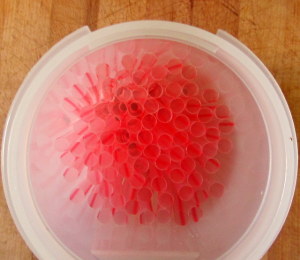 Then you need something to hold the straws. The liquid is not going to all stay neatly inside the straws, so it needs to be tall enough. Also you need to be able to really fill it with the straws, so something that isn’t straight sided has problems. I used a drinking glass for an earlier version, and it really wasn’t deep enough, and it curved at the bottom… didn’t quite work well. I suddenly realized we had just washed out a canister designed for spaghetti – perfect! (Some people seem to have success with cutting off the top of a milk carton.) Fill the container with as many straws as you can cram in – I thought I had, but could probably have gotten a few more in.
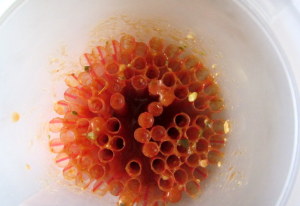 Once the straws and the juice is all ready, gently pour the juice into the mold, pouring into the straws as evenly as you can. Tap it to release air bubbles, then put it in the refrigerator. (One advantage to using the canister? It has a lid!) I wanted to be sure it was a firm as it could get, so I let it chill until the next day.
Edited to add: see comment below. A reader pointed out that it would be much easier to put the juice in first, and then place the straws – and of course she’s right. I can’t imagine why I did it the other way…
The next day, I took it out. (And you may notice – the first day was sunny, the second was raining, and my light, and therefore color, is radically different… sorry about that…) Now we get to the messy bits…
 First, I needed to unmold the whole mass from the spaghetti canister. I ran hot water over it, and then poked at the straws to loosen them from the side. It the canister had been a circle, I think I would have been able to slide them around – as it isn’t, it all took a bit more fussing to let air in. Eventually, though, the mass all slid out.
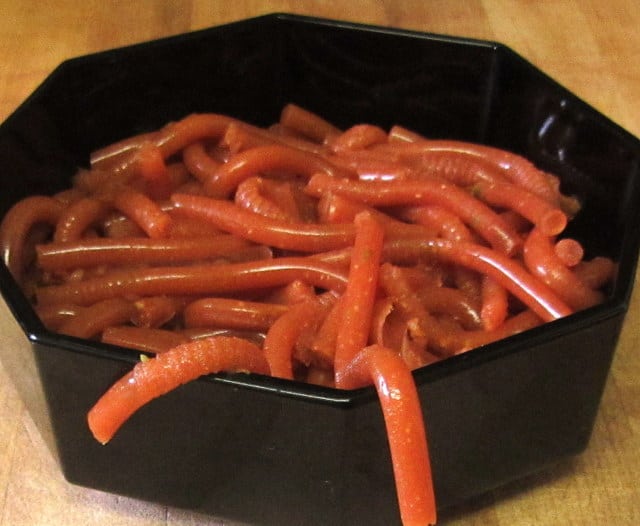
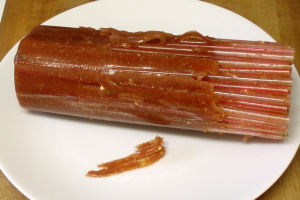 But it’s not as if the gel was all neatly inside the straws… it was all around them. I pulled the straws apart – and noticed the the refuse (the worm castings, if you will) were pretty wormy themselves… You might use them in the bowl with the worms, or eat them first as the treat for the person doing the work. Pulling them off the straws was really the messiest part, so if you do have kids, get them to do this part and treat them with the worm castings.
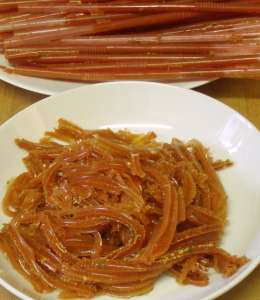
I then tried unmolding some of the worms at this point, so I will tell you – don’t. They’re too soft, and while they were cute, they were hard to handle. Put the straws back in the canister, and back in the fridge for at least a few hours – a day won’t hurt. I found the ones I’d put away for a day were much firmer and easier to handle – drying slightly seemed to help a lot.
OK, the next day (Hey – the sun is out again, and the color is better!) I went all out on unmolding. First I tried what I’d done the day before, squeezing them out manually. (I did try, both days, running hot water to “let them slide out” – they didn’t slide anywhere, but it softened them enough to make them hard to handle.) It worked pretty well, though squeezing past the flexible accordion part was a problem. Then I asked Rich to help me, just to give my fingers a break – and he’s a tool using person… he solved the problem.
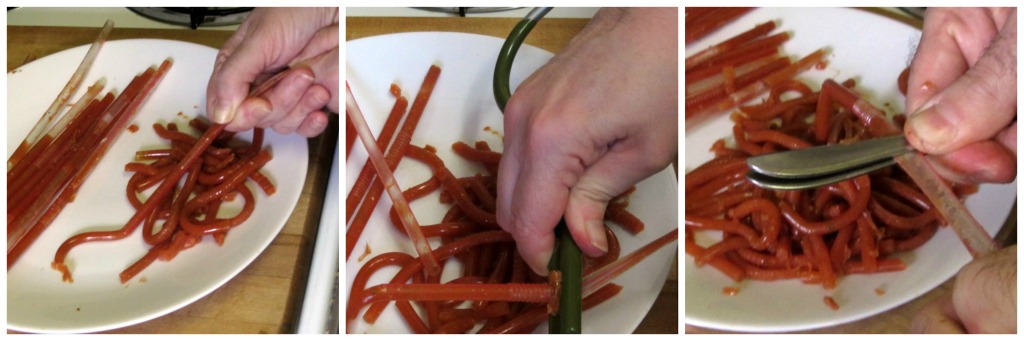
This green thing is a jar opener. The key is the handles that come right together. He started at the end, squeezed, and ran it along the straw until he reached the flex part. Then – this was a big help – he started again at the top, and let the air in the straw push the rest out… so that he wasn’t running along the flex part. This made the whole process both faster and easier on the fingers. (A few straws split – that was messier…)
 Now, we realized not everyone has a jar opener shaped like that… so we tried other tools. Pliers would probably work – clean them well first, of course… But then he tried nesting 2 spoons together and using their handles – bingo. The worms slid right out under the pressure. Very neat.
Now – with the ones that had stood another day after unmolding from the canister and worm refuse, the worms were firm enough for finger food. The ones I had unmolded the previous day were not, at first – but were firm enough the second day, after sitting uncovered in the refrigerator. They clearly dried a little, and that helped. Either way, after a day they could be picked up, they could sit out at room temperature without softening too much to snack on.
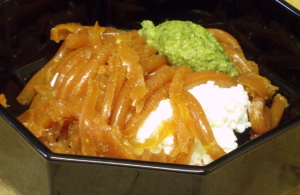
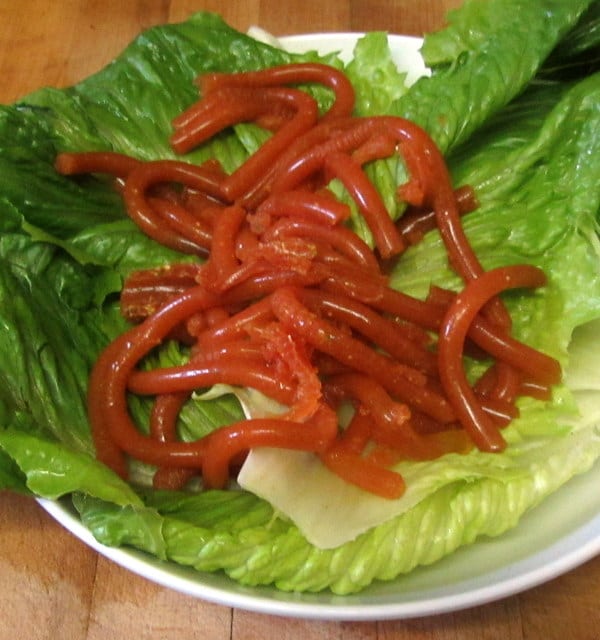
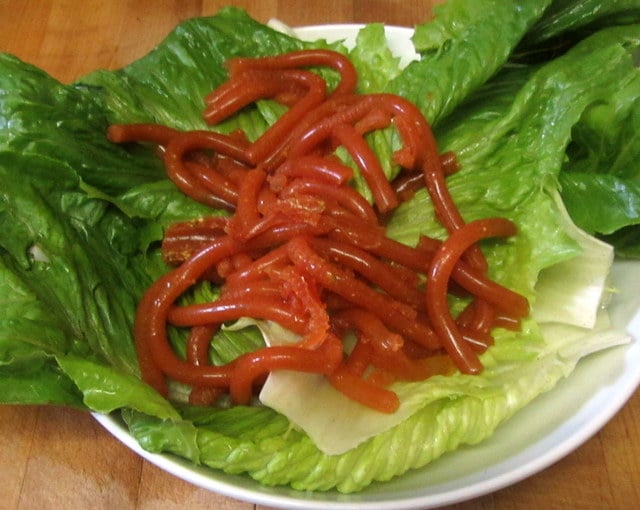
The ones I had the first day, I mostly put over cottage cheese (with a little more pesto) and they were fun to eat – so that is certainly an option, just for a fun meal for the family. For a party, though, I’d make it all well ahead, and give it time to firm up and dry a little, so you can pick up squiggly worms from a bowl…
Savory Halloween Worms
Ingredients
Method
- Put 1 c juice in a small saucepan. Sprinkle all the gelatin over it. Let rest five minutes to soften. Heat juice and gelatin mixture, stirring, until all the gelatin melts and the juice looks glossy.
- Mix the yogurt and pesto into the second cup of juice. Stir the gelatin mixture into the seasoned juice.
- Fill a tall, narrow container with drinking straws. Pour the juice mixture into the straws and chill until firm, at least several hours.
- Unmold. Let rest at least a few hours, preferably overnight, uncovered in the refrigerator, to both chill and dry slightly, until firm to the touch (so that it will stay firm at room temperature.)
These look really realistic. just like realy worms
Thanks!
I was surprised how real they looked – that went even better than I’d expected!
They sound brilliant! What fun for a halloween dinner party or something! 😀
They are fun.
I made a salad of greens, and some of these peeping out from under the leaves… You can really play with them, as well as just serve the basic bowl of worms. (There is a temptation to serve them from a can, but I decided that sharp edges and such just made that a Bad Idea, no matter how clever it sounded.)
You could do it with a can that’s made to be resealed with a plastic lid — peanuts or coffee for instance. Although a coffee can would need a lot of worms…
Hmmm… the ones with the peel off seals don’t have sharp cut edges.
That’s a thought…
These look like fun! When my son was little we used to really get into the Halloween spirit, now with him off to collage, not so much. But these would have been a big time hit!
Thanks! They were fun!
I probably would not have made them just for ourselves – but we have friends who give a Halloween party every year. And the host doesn’t really care for sweet stuff so I knew he’d get a kick out of these.
Wow… I have a bunch of boys coming to our halloween bash this year. I am definitely going to make them. So fun!!
Oh, perfect! I do hope they enjoy them as much as our friends did!
This is crazy! Never even thought about making worms before, but gummy worms are my weakness!
I’d never have thought of it if I hadn’t seen someone do the sweet version… But it was sweet, not even the sweet/sour that gummies usually are, and… it kicked around in my brain for a while before I did it.
They were so fun to pull out at a party, though… LOL
These are great — but make it easy on yourself! Fill the glass with the gelatin, THEN pack in the straws. No mess and no air bubbles.
Oh, my! That would actually make sense!
Looking back (a year later…) I can’t imagine why I didn’t do it that way. You’re right, of course – that must be much easier!
Otherwise – I’m so glad you like them! Thank you for letting me know (and making that sensible suggestion.)
Lol these are perfect. They look so lifelike, but I guess that’s good for Halloween haha. Scary. I like the idea of this being a savory treat!
LOL I was amazed by how good they looked! (And I wish I knew who first thought of using straws for this – I would so love to give credit where it is due. Fantastic idea!)
Sometimes you need something that isn’t sweet – sometimes it’s just fun to have the Halloween Food on the buffet table earlier in the meal. When I brought these to a party, people seemed to like them along with cheese and dips and the like.
Super creative and creepy idea for Halloween! Using these on a salad is brilliant.
Thanks!
And the salad was just fun… LOL